Lightroom is an amazing piece of software for the photographer – particularly if you’re an event, documentary, or photo journalist. It’s batch editing capabilities are unparalleled. That said, if you’re new to Lightroom it can be a bit overwhelming. We hope this post will simplify some things for you. Here’s what you need to know to do some basic editing with Lightroom:
Note: This is more a technical post than a creative post. We get more into creative decisions in another series.
Step 1 – Get Lightroom
![]()
First things first. You can get Lightroom for one month – FREE.
If you’re just learning, I definitely suggest going with the trial version to start out. It gives you time to get your feet wet, without any real commitment.
If you’re ready to start a serious relationship with Lightroom, you can sign up for Adobe Creative Cloud. When you get Lightroom as part of a Creative Cloud membership, you can edit and organize images anywhere, anytime on your iPad and iPhone. Learn more about the plans Lightroom offers here – pricing and plans.
Step 2 – Download VSCO Presets

This part will cost you and there’s really no way around this at time of this post. You need to buy and download VSCO presets. I’ve included a custom preset at the end of this post for free if you want to try that out first, but you won’t really get the idea without at least 1 full collection. VSCO offers 5 different sets of VSCO film presets for Lightroom – We have 02, 04, and 05 and that’s all we need for now.
When you buy and download the VSCO presets they will also tell you how to install them so when you open Lightroom they will already be in there.
Step 3 – Go Take Some Pictures
Once you’ve activated your Lightroom trial or started your monthly subscription, got your VSCO presets, it’s time to go take some photos. My suggestion, go out somewhere for an hour with a friend or pet and photograph them in five different locations with different lighting. It will be helpful later on to have these different looks. A few notes about your in camera settings:
Shoot RAW – shooting RAW takes up more space and is cumbersome to work with if your computer isn’t super fast, but there’s a discernible difference between the way VSCO handles JPGs and RAWs. The presets are actually built to utilize the amount of data and information a RAW file contains, so you won’t get the most accurate or interesting edits without shooting RAW.
Note: Some people have asked me if you can you edit photos taken with an iPhone in Lightroom. Sure, you can. But, it’s probably not worth it. Your best best is to use the VSCO mobile app. It’s made for mobile photography.
Step 4 – Import and Organize Your Photos Using Photo Mechanic.
Yes, you have to use another program if you want to do it the way we do it. It’s an extra step, but it will save you time in the long run. And since time is money – it will save you money, too. You can read all about importing and organizing your photos using Photo Mechanic here: CNW Photo Editing: Part 1: Culling Photos
The reason we use Photo Mechanic is simple – it handles RAW files much better and cuts your culling (the process where you select which photos are worth keeping) so much faster.
Step 5 – Import Your Photos Into Lightroom
Now, that you’ve organized all of your photos (I know you did it, right!?!), it’s time to import them into Lightroom.
- Open Lightroom
- Create a new catalog – name this Catalog “TEST 1” (we create a new catalog for every major event). We also have catalogs for things like “personal photography” or “Harper” for pictures of our daughter. A catalog is a database that tracks the location of your photos and information about them. When you edit photos, rate them, add keywords to them, or do other things to photos in Lightroom, all of those changes are stored in the catalog. The RAW files themselves are not touched. Some photographers will work with only one catalog for an entire year. We think this is crazy, but whatever works.
- Use the import button on the left hand side or go to file > import. Find your RAW photos you organized in the previous step and import them. The cool thing about doing the culling work before hand is that you are working with images that are good enough to pass your initial litmus test. That means you can get right into the editing and not worry if the image is “good enough” to waste your time on.
- Sort the photos by capture time (see fig. 1)
- Now select a photo and double click to make it the main photo in your window.
- Tab over to the develop module. Now you’re ready to start editing.
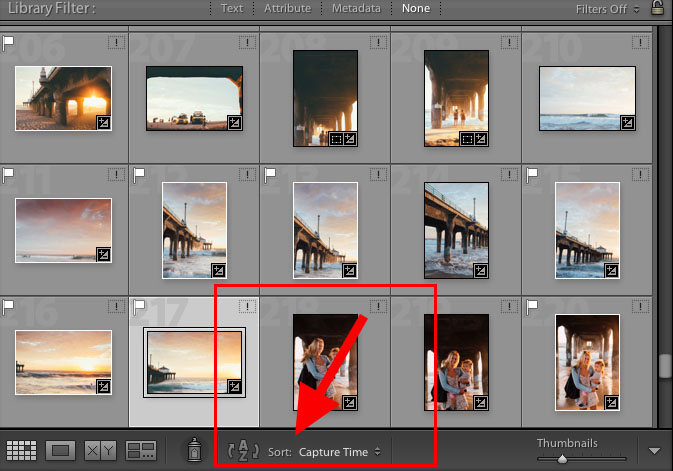
Fig 1
Step 6 – Applying presets and making your photos look “pro”
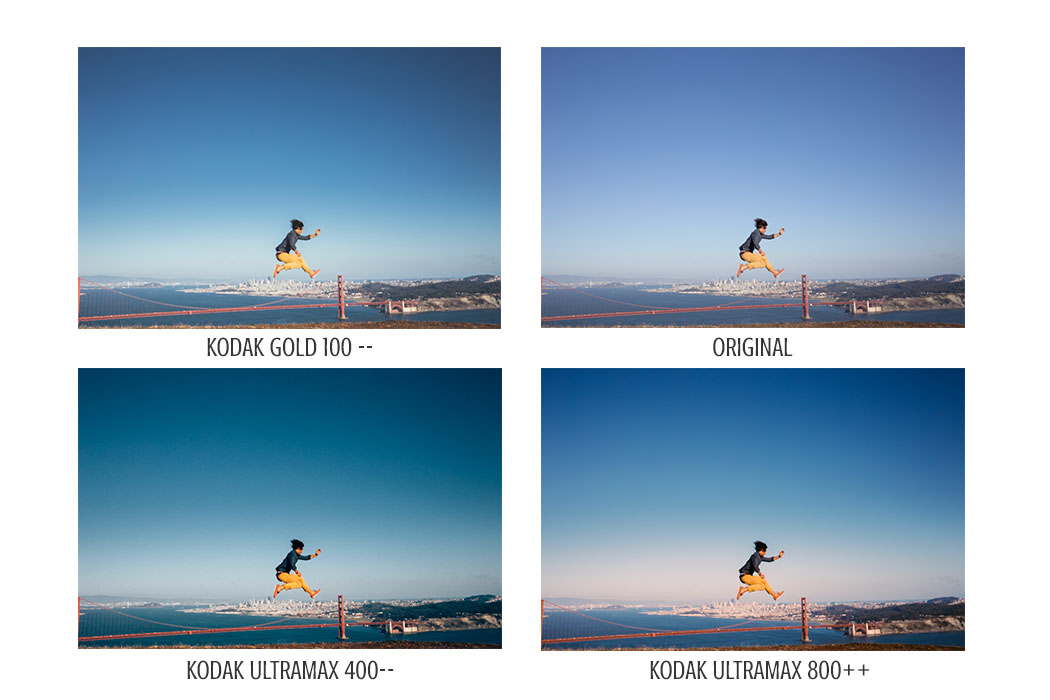
Now the fun part. We start by choosing the first photo and applying one of our “go-to” presets. For LR 5, this includes Kodak Gold 100– | Kodak Gold 400– | Kodak UltraMax 800++. If none of those work, we just keep hunting around for something that will. This is all about personal preference so we can’t really tell you what presets to use here. Just try them out. It’s not going to be perfect and it’s not going to be the only step, but it’s a good start for establishing the mood you want the photograph to portray.
After finding the preset we like, we start making basic adjustments to each photo – correcting exposure, contrast, etc. Assuming photos from that same series were taken with similar in-camera settings, you can then apply the best thing to happen to batch photo editing ever: The Sync Button.
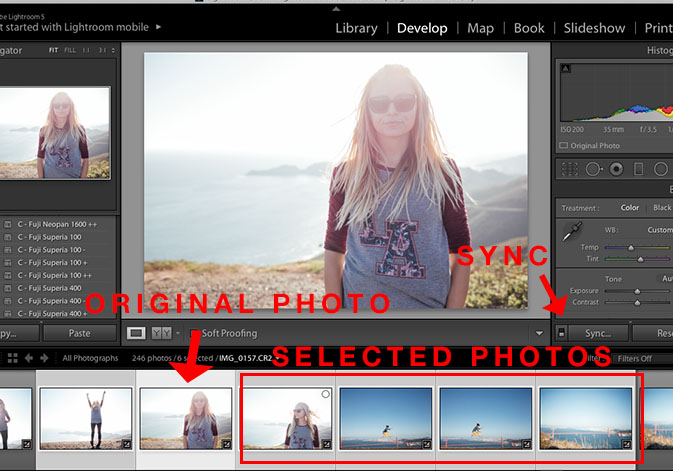
You do this by selecting the edited photo and then holding down command (mac) or control (windows) and selecting the rest of the photos that you want to match this edit. This will give them the same “feel”, but from here you will still have to go in and make individual changes to each photo – that’s if you’re a perfectionist.
Tip: Don’t spend hours on one photo unless it’s for the cover of a magazine or is the featured image on a website or something like that. Documentary style photography actually benefits from a less polished look. This doesn’t mean you should ignore basic mistakes, but don’t try to photoshop your photos in lightroom – that’s not what the tool is for.
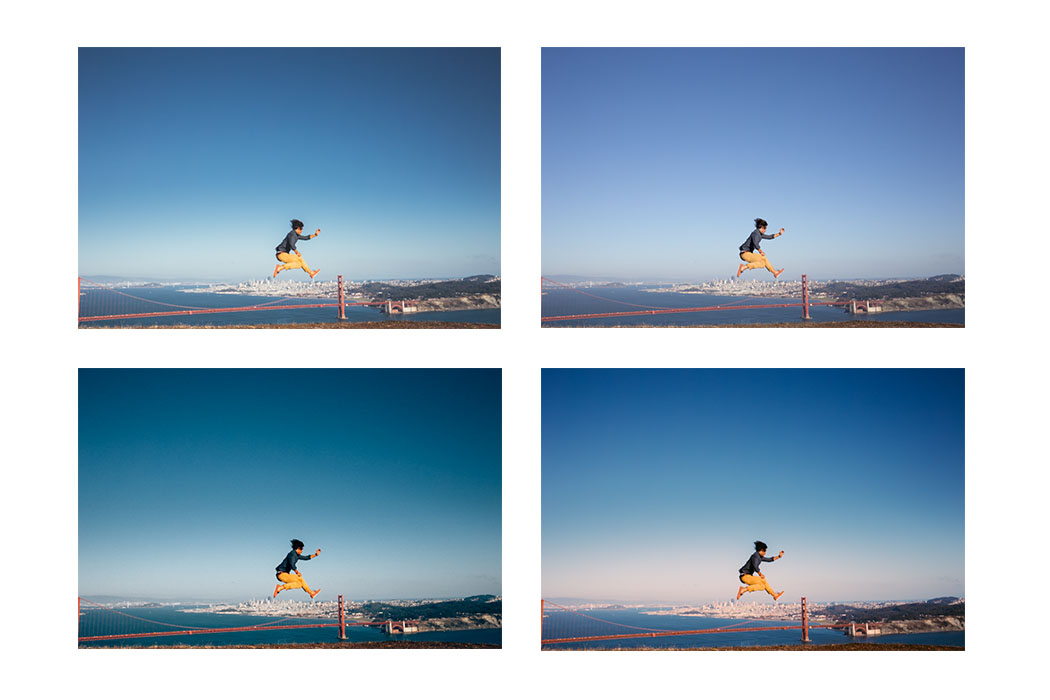
Here are a few examples of the different looks you can achieve:
Download our free Lightroom Preset – CNW: Blue Fade